Workshop 2: Using AV-ThreshR (Multiple Basins)
(Workshop developed for FFG/ThreshR training course, July 25-27,
2000)
INTRODUCTION
This tutorial provides instructions on how to use AV-ThreshR.
Readers who want to know more details about AV-ThreshR methods and the
accompanying database may want to take a look at the AV-ThreshR
documentation. Hyperlinks below link to this user documentation
to explain certain concepts. This tutorial is the 2nd in a
series of 3 tutorials prepared for the FFG/ThreshR/ArcView Workshop held
in Silver Spring, MD in July, 2000.
SETUP
Note: This setup will be done for you at the July Workshop.
On UNIX systems, copy the extension file threshr.avx to either
your Home directory or to the directory /ext under the ArcView3 installation
directory. [On a PC, copy threshr.avx to the ArcViewext32 directory.]
You can obtain the most recent version of threshr.avx via anonymous
ftp to ftp.nws.noaa.gov/oh/gis/threshr.
In the event that you are not sure which version you have, version information
can be obtained through the File -- Extensions dialog by clicking
with the mouse on the Extension name. Information about threshr.avx
will appear in the "About" box. Threshr.avx is dependent on the Spatial
Analyst so the Spatial Analyst Extension is automatically loaded if the
ThreshR extension box is selected. An error will occur if the Spatial
Analyst Extension is not available.
WORKSHOP INSTRUCTIONS
Getting Started
-
Create a directory for output files at the UNIX prompt.
% mkdir output2
-
Start ArcView, open a new Project, and load the AV-ThreshR Extension.
% arcview &
File --> Extensions
-
Identify "output2" as the default output directory by making the Project
window active and then selecting Project --> Properties. In
the "Project Properties" window, enter "output2" in the "Work Directory"
text box.
You will see that two customized Menus, "ThreshR" and "ThreshR-Utility,"
are added to the default View GUI. Whenever a View is active, these
menus are seen. Customized tools have also been added to the Tool
bar  . Use
of several of these tools was discussed in Workshop 1. For the simplest
and most straightforward implementation of AV-ThreshR, the end-user is
only concerned with items under the "ThreshR" menu. Items under the
"ThreshR-Utility" may be of interest to the advanced user but are not discussed
here. Several items under the "ThreshR-Utility" menu were used
for data preparation and pre-processing. . Use
of several of these tools was discussed in Workshop 1. For the simplest
and most straightforward implementation of AV-ThreshR, the end-user is
only concerned with items under the "ThreshR" menu. Items under the
"ThreshR-Utility" may be of interest to the advanced user but are not discussed
here. Several items under the "ThreshR-Utility" menu were used
for data preparation and pre-processing.
Main Menu Overview
The 9 items in the main "ThreshR" pull-down menu are shown below.
The ThreshR menu items are divided into logical groups that are separated
by a horizontal bar. Steps 2, 3, and 4 are pure GIS processing steps
and are also the most time consuming (Step 4 may take hours for large RFC
areas, depending on selected options). Computation time estimates
depend on many factors. It is expected that a user would run steps
2, 3, and 4 only once or perhaps a few times. Steps 5, 6, and 7 are
relatively
fast (minutes for entire RFCs) and users may wish to repeat these steps
to study different UG and flooding flow scenarios. Steps 8 and 9
are required to created gridded threshold runoff estimates from the subbasin
values and export the data for use in the FFG software.
ThreshR
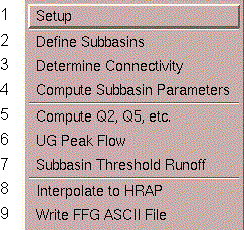
1. Setup
-
Click ThreshR --> Setup. In the input dialog, type the
directory name for the location of the input data, and click OK.
For this workshop (July, 2000) the input directory is: /opt/group1/marfc
or /opt/group2/marfc, etc. depending on your group number. After
clicking OK, click "Yes" when asked "Load Input Data?"
The answer to this question is most often "Yes", unless all of the
input data are already loaded and you are just running setup to change
the identity of the input directory. In either case, the program
will not load a second copy of a Theme to the project if there is
already a data Theme with that name loaded.
The setup program automatically loads the following data into your Project.
Shapefiles:
rfcbound.shp -- RFC boundary defined by the DEM (may be a buffered
RFC boundary for coastal areas
rf1.shp -- a modified version of EPA's River Reach File 1 (RF1); although
not used directly by the ThreshR programs, this file
is useful for spatial reference because it contains river names
statekey.shp -- State Boundaries used for USGS regression equations.
regions.shp -- Regions used in USGS Regression Equations
hrappts.shp -- center points of HRAP cells (this shapefile will look
skewed because of the map projection being used; however, the projection
being used is well suited for the type of analysis being done); interpolated
values of ThreshR are joined to this shapefile and exported to FFG.
Grids:
slopeff -- slope in ft/ft
fd -- flow direction grid
fa -- flow accumulation grid
mask -- buffered mask of RFC boundary; cells within the basin are assigned
the value 1 and cells outside the basin are assigned "NODATA"
fld -- downstream flowlength (m)
Tables:
parcode.dbf -- stores information the programs need to determine
which parameters to compute and how to compute them
regequat.dbf -- stores constants needed for the USGS Peakflow regression
equations in different states and different regions
In these instructions, information about these input data sets is provided
on an as needed basis. Much more information about the input data
is provided in User Documentation: Data, and a
more detailed description of the parcode.dbf and regequat.dbf tables is
provided in User Documentation: Function.
After Setup, your View will look something like this.
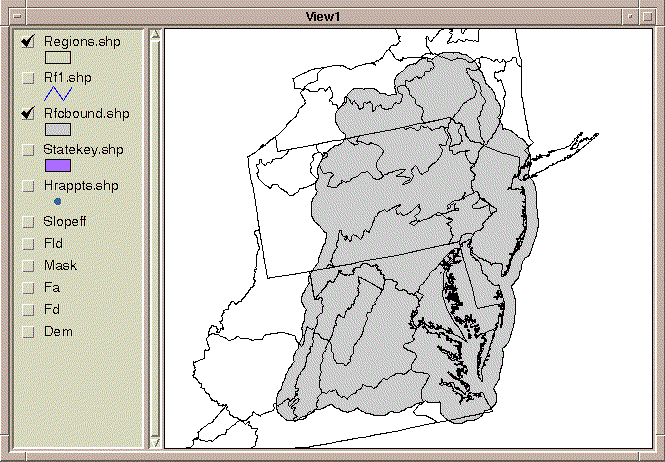
The GIS data sources displayed in your view are not all of the data
sources used by the Av-ThreshR programs. Other input data sets required
for USGS Flood Frequency Regression parameter calculations are accessed
directly by Avenue codes using their file system names (without loading
the data as Themes into a View). This is done to avoid cluttering
up the Theme "Table of Contents" in the View window.
-
With a View active, click Analysis -- Properties and set the Analysis
Extent to Same as the flow direction grid (fd). Also set the
Analysis Cell Size to Same as fd. Set the Analysis Mask to
Mask
and click OK.
By default, AV-ThreshR is set up to work on a large analysis area
the entire RFC. To save time, we will use a smaller analysis area
for this workshop -- a 6862 mi2 area draining the West Branch of the Susquehanna
R. in Pennsylvania. Results covering an entire RFC will be examined
in Workshop 3 with the computationally expensive steps pre-computed.
The analysis area has been delineated for you using the  tool described in Workshop1.
-
Load the polygon Shapefile called "Wsusq.shp" from your "marfc/workshop2"
directory that will define your analysis area for this workshop (
 )
. To view this Theme, turn it "on" in the View by placing a check
next to its name in the Table of Contents. You might also want to
Zoom to the extent of this Theme using )
. To view this Theme, turn it "on" in the View by placing a check
next to its name in the Table of Contents. You might also want to
Zoom to the extent of this Theme using  . .
2. Define Subbasins
-
Click ThreshR -- Define Subbasins and fill out the dialog as shown
below.
MAKE SURE THE "SET MAXIMUM AREA" IS CHECKED (If not, a known bug will occur)
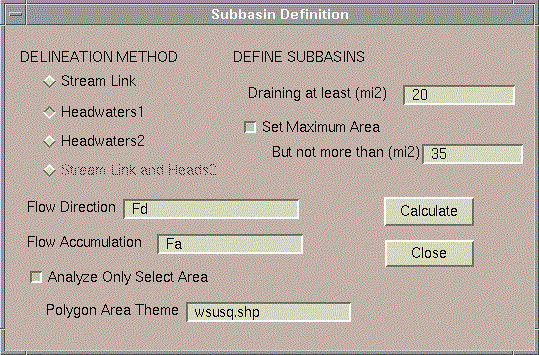
-
Select Headwaters1 as the delineation method. (results will be compared
to precomputed results from the Streamlink method) The starting point
in all delineation methods is to define a synthetic stream network from
the DEM using an area threshold. In the Headwaters1 method, only
the drainage areas defined by the headwater synthetic streams are considered
further. In each headwater stream, the furthest downstream point
that drains less than the maximum drainage area is selected as the headwater
basin outlet. The maximum area criteria helps to create headwaters
that are relatively uniform in size.
-
The program will provide the currently saved names for the flow direction
(fd) and flow accumulation Grids (fa). You should not
have to change these names under normal circumstances.
-
Select the box next to "Analyze Only Selected Area." When this
box is selected, the "Polygon Area Theme" text line becomes enabled.
Enter the name of a polygon theme that will bound calculations -- wsusq.shp
in this case. Note: To analyze the entire RFC, you would enter
"rfcbound.shp" as the "Selected Area Theme" text line.
-
Define subbasins draining at least 20 mi2 and not more than 35
mi2. This produces 99 subbasins ranging in size from 20.8 mi2
to 35 mi2 with an average drainage area of 28.7 mi2.
-
Click the Calculate button to define the subbasins. Calculations
should take about 1 - 2 minutes on an AWIPS workstation. When the
program finishes, a completion report is presented to the user. Click
OK.
Three Themes are added to the View Table of Contents by this program:
shd1.shp -- polygon Shapefile of subbasin boundaries
shdgri1 -- grid of subbasin boundaries
strc1.shp -- synthetic stream coverage based on a 20 mi2 threshold
for reference
The number "1" following these file names will be incremented if a file
with this name already exists in your output directory.
-
If you wish, rename shd1.shp and shdgri1 so that the names make more sense
to you. To rename a Theme, make it Active and select Theme -->
Properties . Type a new name in the box labeled "Theme Name".
Suggested names:
shd1.shp --> Susq Heads Poly
shdgri1 --> Susq Heads Grid
strc1.shp --> Synthetic Streams
Remember, changing the name of a Theme in ArcView does not change the name
of the Source File on disk.
Your View should look similar to the following:

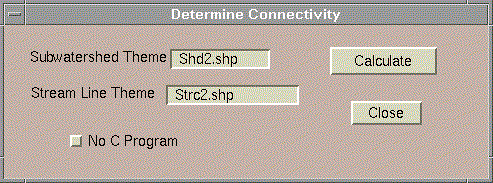
3. **SKIP ThreshR --> Determine Connectivity
because this is not needed when we are making computations for Headwaters
only.
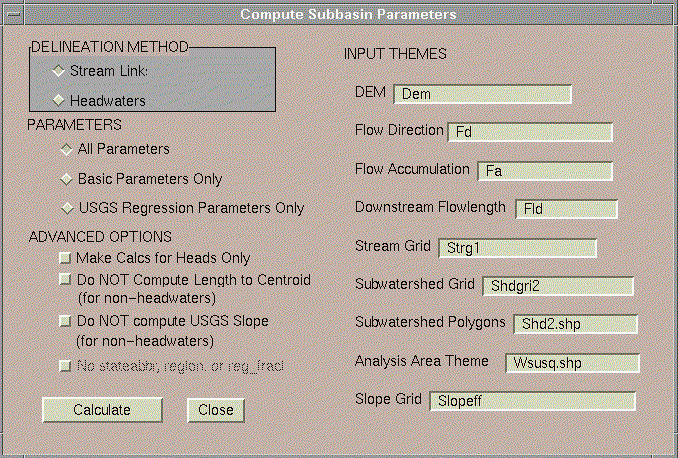
4. Compute Subbasin Parameters
-
Click on ThreshR --> Compute Subbasin Parameters and fill out the
resulting dialog as shown below:
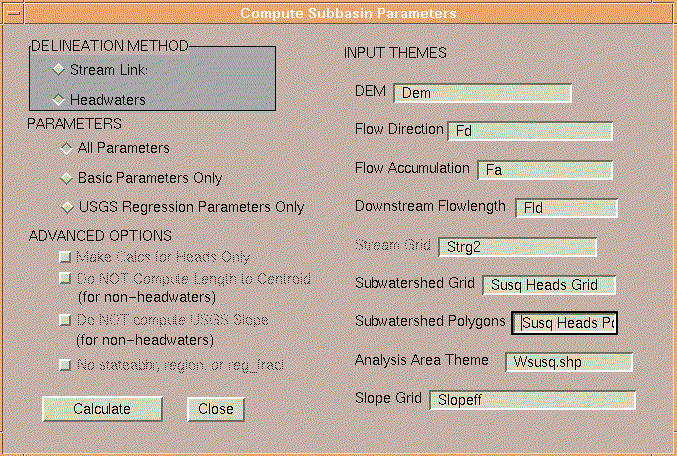
-
In most cases, the correct names for all INPUT THEMES are remembered by
the program so no typing is required. An exception might be if the
ThreshR --> Define Subbasins option is run twice and the user wants to
use the results from the first run -- the program only remembers the identity
of the most recently created Subwatershed Grid Theme and Subwatershed Polygon
Theme, etc.
-
Select Headwaters as the delineation method.
-
Select "All Parameters" for this run.
-
Ignore the ADVANCED OPTIONS for now.
-
Click Calculate. Parameter calculations for this area take
about 4-5 minutes on the AWIPS workstations. Click OK
when the calculations are complete.
The outputs from this program are a Center Point Shapefile Theme
("cntp1.shp") and many attribute fields added to "Susq Heads Poly."
-
Check out the parameters that have been added to your subbasin Attribute
table by making "Susq Heads Poly" Active and clicking
 .
It is helpful to enlarge the Table window and scroll to the right. .
It is helpful to enlarge the Table window and scroll to the right.
With the "All Parameters" option selected, both basic subbasin characteristics
and characteristics required for regional USGS Flood Frequency equations
are computed. The "basic" characteristics computed by the program
are described in ThreshR Functionality
Table 2.2.1. Scroll to the right in "Attributes of Susq
Heads Poly" and you will see the values for parameters listed in Table
2.2.1: arm, chsl0, chln, chsl, chcn, centlat, centlon, altind, stateabbr,
regions, and reg_fract.
-
Question: What is the average channel length ("chln") for the basins
you have defined? (Hint: select the CHLN field by clicking on the word
"chln" with the mouse and then hit Field --> Statistics. CHLN units are
miles.)
These basins in the W. Branch of the Susquehanna R. intersect with
USGS Pennsylvania flood regions 2, 5, and 6 defined by Regions.shp.
If you look at the photocopies of USGS WRIR 94-4002 pp. 135-138 handed
out in class, you will see that the only "non-basic" parameters required
in any region of Pennsylvania are:
STRP_PA: basin storage (1 plus the percentage of drainage area
shown to be lakes, ponds, or swamps on topographic maps)
Note: There may be an error in the storage layer delivered
by the contractor; however, this should not affect the calculations in
this example because this storage parameter is not required for equations
in regions 2, 5, and 6.
PRE_PA: precipitation index equal to average annual precipitation
minus annual average potential evaporation
-
STRP_PA and PRE_PA are the last two fields in "Attributes of Susq Heads
Poly" The program knows that these are the only two non-basic parameters
required in Pennsylvania becuase there is a field in the Theme "statekey.shp"
called "params" that lists all of the non-basic parameters in each state.
Make Statekey.shp the active Theme and take a look at this field using .
The program needs to know not only which parameters to calculate
for a given location but how to make these calculations and where the input
information is stored. To provide this information to the program,
the file parcode.dbf has been created (a detailed description of
parcode.dbf
is provided in Function:
Compute Subbasin Parameters )
-
Take a look parcode.dbf by activating the Project Window, clicking
on the tables icon
 and
double-clicking on parcode.dbf. This table was loaded into your project
by the Setup scripts. This table contains information about
all of the parameters in MARFC. and
double-clicking on parcode.dbf. This table was loaded into your project
by the Setup scripts. This table contains information about
all of the parameters in MARFC.
You will see in parcode.dbf that the source file ("srcfile" field)
for the parameter PRE_PA is named pre_pa and that this file is located
in the source directory "pa". As you can see, not all of the input
Themes for parameter calculations are automatically loaded into your View.
-
To take a look at pre_pa, load this Grid from disk using
and selecting "Grid Data Source" as the Data Source Type.
5. Compute Q2, Q5, etc.
-
Click ThreshR --> Compute Q2, Q5, etc. The default dialog settings
(as shown below) should be correct provided that you have not deviated
from these instructions.
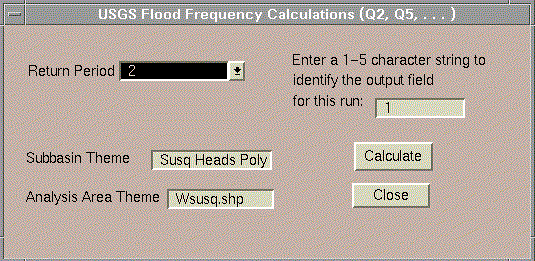
-
Click Calculate. Calculations should only take a few seconds.
The program creates a new field in "Attributes of Susq Heads Poly"
containing Qx values for each subbasin. The run identifier is used
to give this output field a unique name. If the return period chosen
is "2" and the run identifier is "1", then the output field is named "Q2_1."
The units for this field are cfs.
-
Take a look at the output by editing the Theme legend for "Susq Heads Poly"
to map Q2_1. (Double-click on the "Susq Heads Poly" Theme, select
"Graduated Color" as the legend type, choose Q2_1 as the classification
field, and then click "Apply.") The Q2 results show considerably
higher values in Region 2 (see "regions.shp"). This is probably a
reflection of the higher regression equation coefficient for the Q2.33
equation this region (see USGS WRIR 94-4002 pp. 135-138).
6. UG Peak Flow
-
Before selecting this menu item, load
grids of Cp and Ct that were created for PA from the "pa" ~/marfc/subdirectory.
These grids were created using data from Miller et al. (1983).
Data for mean Cp and Ct in 25 basins were plotted at basin outlet points.
Cp and Ct grids were then interpolated from these points using an Inverse
Distance Weighting Scheme.
-
Click ThreshR -- UG Peak Flow and set the dialog options
as shown below:

-
The program should have identified "Susq Heads Poly" as the Subbain Theme
and the run identifier should be the same as that for the peak flow calculations
("1"). Leave these inputs as is.
-
Since grids of Cp and Ct are available for this area, click the box next
to "Snyder Cp and Ct from Grids" and choose the Cp and Ct grids in their
respective combo boxes.
-
Click Calculate and Click OK when calculations are complete.
With this option selected, five new fields are added to the attribute
table of Susq Heads Poly. These fields are cp, ct,
Qsd1_1,
Qsd3_1,
and Qsd6_1 respectively. Qsd1_1,
Qsd3_1, and
Qsd6_1
represent the 1 hour, 3 hour, and 6 hour unit hydrograph peak flows respectively
in [cfs].
Note: Although the Snyder unit graph method is the only
UG method currently supported through a dialog interface in AV-ThreshR
1.1, other unit graph approaches could be implemented manually using the
ArcView table calculator ( )
and stored parameter values. Additional automated unit graph options
can be added in Av-ThreshR updates if there is demand from users. )
and stored parameter values. Additional automated unit graph options
can be added in Av-ThreshR updates if there is demand from users.
7. Subbasin Threshold Runoff
The function of this step is to simply create a new field (or fields)
in the subbasin theme that contains the computed threshold runoff for a
selected duration (or durations). The scripts run in this step provide
an interface for making the necessary tabular calculations (dividing the
bankfull flow field (cfs) by the unit graph peak flow field (cfs/in)).
If the bankfull flow or unit graph peak values for any of the subbasins
are 0, then the value in the output field is flagged as -1.
-
Click ThreshR --> Subbasins Threshold Runoff, select "Susq Heads
Poly" as the Subbasin Theme. When a subbasin Theme is selected, the
"Flooding Flow Field" dialog is populated with the available fields from
"Susq Heads Poly." Select Q2_1 as the Flooding Flow field
and select Qsd1_1, Qsd3_1, and Qsd6_1 as the UGPeaks (hold down the shift
key to select multiple fields).
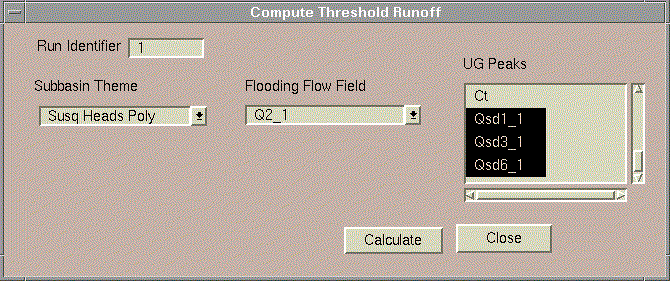
Three new fields are added to the attribute table of "Susq Heads Poly":
tr1h_1,
tr3h_1,
and tr6h_1. These fields contain values for 1 hour, 3 hour
and 6 hour threshold runoff respectively. For example: Q2_1 in cfs
is divided by Qsd1_1 in cfs/inch to derive tr1h_1 in inches.
-
Display a graduated color map of the subbasin threshold runoff results
in the field tr1h_1 using a default legend file named ~/marfc/workshop2.avl.
(Double-click Susq Heads Poly in the Table of Contents. Select Legend
Type: Graduated Color. Select Classification Field: tr1h_1.
Hit the Load button and choose the legend file workshop2.avl. At
the Load Legend dialog, select tr1h_1 as the field and check the
"All" box to load both Classes and Symbols. )
You can create your own legend if you don't like this one but this
legend is useful for consistent comparison with later results.
-
Compute statistics for the tr1h_1 field by making Susq Heads Poly
the active Theme, clicking on ,
selecting the field tr1h_1 with the mouse, and then choosing the
menu item Field --> Statistics. You will see that the
statistics for 1 hour threshold runoff values in the 99 subbasins are:
mean = 1.2 in.
max = 2.04 in.
min = 0.56 in.
8. Interpolate to HRAP
-
Click ThreshR --> Interpolate to HRAP
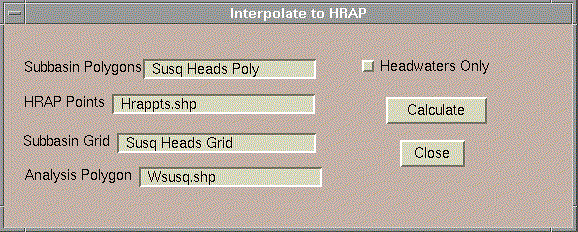
The correct Theme input names should be provided for you in the dialog.
There is an option to interpolate values only from the headwater outlets.
You DO NOT need to select "Headwater Only" since all of your subbasins
in this workshop are headwaters. This option is useful if you have
used the Streamlink delineation method and want to only use headwater threshold
runoff values in your interpolation.
-
Click Calculate. You are prompted to select the field with
ThreshR values to be interpolated. Select tr1hr_1 and click
OK. This program should take about 3-4 minutes.
In the Avenue program, interpolation to the hrappts.shp locations
is actually accomplished in 3 steps: (1) hrappts.shp points that lie within
subbasins with known threshold runoff values are assigned the corresponding
subbasin values, (2) a continuous grid of interpolated threshold runoff
is created using the hrappts.shp points with known values as input, and
(3) values from the interpolated grid are mapped back to hrappts.shp to
provide a complete set of values for all HRAP cells within the analysis
area.
Two outputs are created by this program:
-
Trgrid1 which is created for display purposes only.
-
An attribute field called tr1r_1 that is added to hrappts.shp.
This field contains interpolated values of the 1 hour threshold runoff.
If a field named "tr1r_1" already exists, then the user is prompted to
enter an alternate name.
-
Zoom to the extent of the "Susq Heads Poly" Theme ().
Put the hrappts.shp Theme at the top of the table of contents and make
this theme visible to show the point locations. You will see that
all Hrappts.shp points within your analysis area have been selected.
If you look at the table for this Theme (hrappts.shp), you will see that
tr1h_1 values have been calculated only for selected points (
and
 ). ).
9. Write FFG ASCII File
-
Click ThreshR --> Write FFG ASCII File
-
Select hrapptst.shp as the HRAP Theme.
-
Select tr1r_1 as the field with threshold runoff values
-
Select wsusq.shp as the analysis polygon Theme
-
Enter 1 as the unit graph duration
-
Enter any text string as the output file name.
An ASCII file with the specified name is written to the ArcView Project
Working Directory ("output2"). This file can be loaded into the FFG
software.
-
It is probably a good idea to save your project at this point by clicking
File
--> Save Project.
Cumulative Results for Non-headwater Basins
In Step 2, the decision was made to only consider headwater basins with
sizes ranging from at least 20 mi2 but no more than 35 mi2. An alternative
option is to define define both headwaters and downstream basins using
the "Streamlink" approach. Because certain parameter calculations
are more time consuming when values for downstream interbasins are desired
(CHSL and CHCN in particular), the total processing time required
for the streamlink approach is often considerably longer than when only
headwaters are considered. Although probably longer than you want
to sit and wait during this workshop, these computations are not overwhelming
considering the coarse scale DEM (400 -m) being used. Streamlink
computations for the analysis area chosen for this workshop took about
20 minutes.
To compare with headwater values, results using the streamlink approach
have been pre-computed for you. The procedures used are similar to
those described above with slightly different options for Define Subbasins,
Determine
Connectivity, and Compute Subbasin Parameters. The
Compute Q2, UG Peak Flow, and Subbasin Threshold Runoff options were the
same.
The dialogs used for Steps 2, 3, and 4 looked as follows:
Step 2

Note that a maximum area of 770 mi2 (2000 km2) was used. 770 mi2
is an often cited threshold for when unit hydgrograph theory breaks down.
Step 3
Step 4
Note that the Streamlink approach allows for a wider range of headwater
basin sizes and a higher mean value.
Puzzle: Why is it that Headwaters1 produces only 99 basins
while there are 100 headwaters produced by Streamlink?
-
Display the values in the tr1h_2 field of shd2.shp using the
workshop2.avl. Note how threshold runoff values tend to increase
with drainage are in this region. As discussed in lecture, this trend
may not be true for other regions.
It is difficult to visually compare shd2.shp and Susq Heads Poly when they
are loaded in the same View. It might be helpful to reload shd2.shp
in a new View. An alternative for side-by-side Viewing is to use
a Layout.
Save your Project File before exiting from ArcView!
End of Workshop2
REFERENCES:
Miller, A.C., S.N. Kerr, and D.J. Spaeder, "Calibration of Snyder Coefficients
for Pennsylvania," Water Resources Bulletin of the American Water
Resources Association, 19, 4, August 1983.
|