
Unseasonably warm temperatures continue through the weekend across the Southwest and southern U.S., with more than 100 record or near record maximum temperatures forecast through the rest of the week and over the weekend. Elevated to critical fire weather conditions will persist across the Plains and Southeast U.S. this weekend. Read More >
**Click each tab below for details of each experiment**
light is made up of many colors: red, orange, yellow, green, blue, indigo and violet. When light passes through the water, it is broken up into all of the colors seen in a rainbow.
**Click each tab below for details of each experiment**
The warm water heats the layer of air that it touches. Some of the water evaporates into the air forming water vapor. The warm air containing water vapor rises, and then cools, as it comes in contact with the air cooled by the ice. When the water molecules cool, they slow down and stick together more readily. The particles of smoke act as nuclei for “bunches” of water molecules to collect on. This process is called condensation.
Water is flowing from one position to another; heat is being transferred; convection is occurring in the container! The cold, blue water sinks, while the warmer, red water rises. The red water stays higher than the blue.
The cold plate causes the moisture in the warm air that has been heated by the hot water inside of the jar to condense and form water droplets. These droplets should be dripping from the bottom of the plate inside of the jar. This is the same thing that happens in the atmosphere as warm, moist air rises and meets colder temperatures high in the atmosphere. Water vapor condenses and forms precipitation that falls to the Earth as rain, sleet, hail, or snow.
The whirling fan at the top creates a spinning "updraft" or vortex. This pulls air in at the bottom of the container and out at the top of the plant saucer. Dry ice is made of frozen carbon dioxide. It is very cold. As it warms, it turns from a solid (ice) into a gas. It cools the air above it, causing a little cloud of water vapor to condense from the air. The little cloud enters the updraft, allowing us to see the vortex. It looks like a little tornado!
This is concept is not completely understood by scientists, but one way the rotation appears to happen is when winds at two different altitudes blow at different speeds creating wind shear. For example, a wind at 1000 feet above the surface might blow at 5 miles mph. A wind at 5000 feet might blow at 25 mph. This causes a horizontal rotating column of air.
If this column gets caught in a supercell updraft, the updraft tightens the spin, and it speeds up. This is much like when a skater's spin speeds up, (much like a skater spins faster when the arms are pulled in close to the body). A funnel cloud is created.The rain and hail in the thunderstorm cause the funnel to touch down. This creates a tornado.
It's all about static electricity! Lightning happens when the negative charges (electrons) in the bottom of the cloud (and your finger) are attracted to the positive charges (protons) in the ground (and the pie pan). The resulting spark is like a mini-bolt of lightning.
The accumulation of electric charges has to be great enough to overcome the insulating properties of air. This allows a stream of negative charges to pour down toward a high point where positive charges have clustered due to the pull of the thunderhead. The connection is made and the protons rush up to meet the electrons. It is at that point that we see lightning. A bolt of lightning heats the air along its path causing it to expand rapidly. Thunder is the sound caused by rapidly expanding air.


 Local Radar
 Huntsville Radar
 Regional Satellite
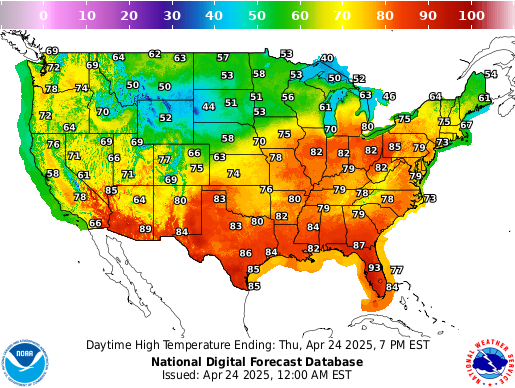 Graphical Forecast
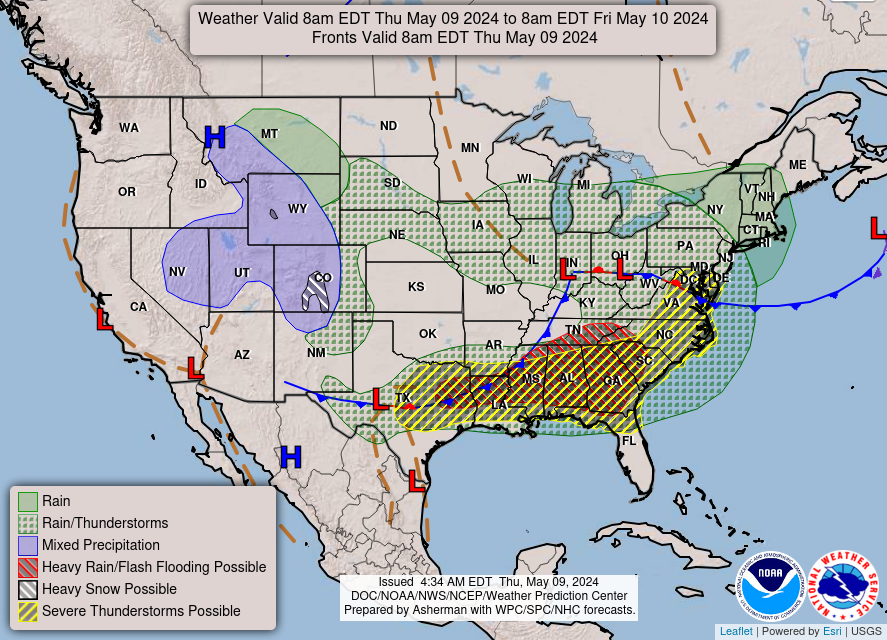 Weather Map